Sammy and I had a blast making some Halloween tie dye shirts a week or so ago, using a kit I got at Michael's with my 40% off coupon. They also had t-shirts for $2, but you could easily use any old white shirt or pick one up at a thrift store!
First I had to wash the shirts, with no fabric softener. I pulled them out of the washing machine and, leaving them wet, we put rubber bands on them...
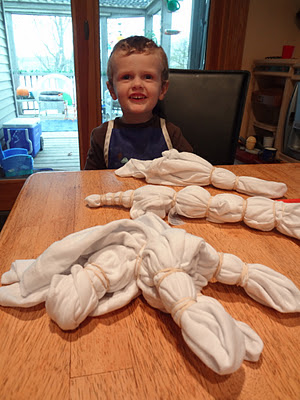 |
| One for Sammy, one for Toby, and one for Mommy! |
 |
| Sammy got a kick out of the plastic gloves! |
The kit was super easy...just add water to the bottles which already had powdered dye in them, and shake! Then apply with the bottle. I was picturing myself having to mix up buckets of dye and do it out in the back yard, but this was nice, neat, and simple enough for this almost-4-yr-old to do with a little help!
 |
| Sammy applying the orange dye up to the rubber band |
 |
| Finishing off the dye |
 |
| I set them on a foil lined cookie sheet, with a piece of plastic wrap over them, for 8 hours or so. |
Then comes the fun part...opening them up and seeing how they turned out! The instructions had some cute ideas for jack-o-lantern and spider web designs and we pretty much followed those closely. I kindof made mine up as a spinoff of Sammy's pumpkin shirt, with 3 pumpkins...
Then after you wash them and dry them you can add some designs with the fabric paint. The kit also came with a glow-in-the-dark paint but I just used this black:
Here are our 3 shirts all done! Toby won't fit into his until at least next year, as the smallest shirt Michael's had was still too big for him. But, I think I like his the best, with the spider web!


No comments:
Post a Comment