
Showing posts with label websites. Show all posts

Monday, October 11, 2010

ID Mommy MOMtrepreneur Tips: Photographing Your Products

Are you a fellow MOMtrepreneur who sells your products online?  If so, chances are you've had the need for good photos of what you make and sell. Having good quality photos of your products is really vital, especially if you are selling them online and photos are the only basis for your customers to make their decision on whether to buy.  Plus, professional looking photos will help your website and business look more professional.

Decide What to Capture:
Besides capturing an overall image of your product, you want to make sure your photos are extremely clear, and accurately convey your product's quality, color, texture, construction, size, etc.  Imagine you are shopping in a physical store location, and you see one of your products on the shelf.  How will you examine it and what will you want to look at? For example, if it's a bracelet, will you put it on to see how it hangs on your wrist?  Then take a photo of it on a wrist.  Will you look at the clasp to see how it attaches?  Take a close-up of the clasp.  The more details you can show, the better!

Here are a few examples of photos I've taken for my Junk Mail Gems site, highlighting different product aspects:

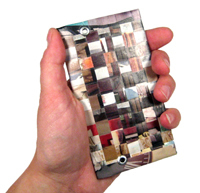


I do edit many of my product shots in Photoshop, often taking out the background completely so they are on white (like the coin purse and wallet above).  You may also want to experiment with other nice backgrounds and props, like sand, grass, wood, velvet, or whatever else might fit within the realm of the products you are photographing.  I always try to include something that helps show the scale of the product, when scale matters.  Things like the coins, hands, fruit, and hardware details help convey scale too. 

Camera
You'll obviously need a decent camera.  While you can spend hundreds or even thousands of dollars on equipment, I have found that for the purposes of shooting my product photography in my limited budget, my day-to-day digital point-and-shoot works just fine. I set the lighting to match the type of light I am using, put it on macro mode, and in my gorilla pod to keep it steady.  If I really want to keep it super steady, I will set it to take a photo automatically after a 10 second delay, so my hands are not even touching the camera when the photo snaps.


If you're using a digital point-and-shoot like me (I know, I know, you professional photographers are cringing now), get to know your light setting options.  This photo above shows the difference in the color of the plain white background (on the camera screen) when it's set at "cloudy" versus "incandescent" lighting on my camera.  You'll want to set it to match your light settings as best you can, so that the image on the screen most closely resembles reality.  I also set mine on the "macro" setting when I'm shooting something small and close-up, to get the best detail and make sure everything is in focus.

Proper Lighting
Lighting and the environment is really the most important thing when it comes to getting clear shots of your product.  Harsh lights will create harsh reflections and shadows, both of which hide your product rather than highlight it.  Photographing your products outside on an overcast day works great, because the clouds act as a diffuser for the light.  However, you can't always rely on the weather, and if you're like me and do most of your work at night when the kids are in bed, you can't rely on the sun still being up either.  The best way to prevent harsh lights and shadows indoors is to use a light box or light tent to diffuse the light and create a seamless background.

For years I used a simple cardboard box with "windows" of vellum or tissue paper taped to the sides, a piece of paper inside for a backdrop, and my desk lamps pointed at it.  This really did work great for so many of my small product shots.  All of the photos taken in the above examples were done in a cardboard box.  I was going to put together a tutorial for you to build your own, however, Darren Rowse has already posted a really great one online, here.  Mine looked almost identical to his:

If I had seen this earlier I would have tried fabric instead of tissue paper and had something a little more sturdy!  This site has another similar tutorial using a cardboard box.  You really don't need to buy any big, fancy equipment to greatly improve your photos!!

Once my little boy got bigger, I found myself re-making my mini photo studio because he would get his hands on it and rip it.  Recently I came across this great little set on Amazon for a great price.  For just $30 (at the time) with free shipping I got a compact, folding photo booth, a little tripod, and a set of lights...and this one I can fold up and tuck away from little boys.


 My only complaint with this product was that the back drop only had a gray and a blue side, and I like to use white for my photos.  So, I just taped a piece of paper inside instead:
The reason people like one curved piece of paper like this that spans the back and base, is that it gives you a seamless background, meaning you won't see a back corner running across all of your photos.

So, this is what my current setup looks like.  I point lights from the sides and top and find that my desk lamps work just as well, as long as I set my camera's lighting setting accordingly.  Depending on the product and what you're trying to capture, you may find that you need to adjust the angle of your lights, or pull them back if they are too bright, etc.  Play around with it and do some experimenting...it's the best way to learn!

Make Your Product "Smile!"
If you're married, you probably remember your photographer constantly adjusting things on you while taking your photo...spreading out your train on your dress, positioning your flowers, tilting your head, adjusting your veil...now smile!  The same goes for your product shots. Make sure there are no distracting smudges or fingerprints on your shiny jewelry.  Look at the background and make sure there is nothing distracting from the product.  (My wedding photographer was NOT good...we had background distractions in ALL of our pictures!)  If you have a label, make sure it's turned so that the viewer can read it.  Don't crop out something that an online shopper may want to see.  If you have a chain on a necklace, don't just let it fall in a pile...try arranging it artistically.    Little things like this can make a difference!

More Resources:
My sister recently passed on this great post to me from MomsWhoMakeStuff.com.  If you scroll to the bottom of the post, there is an excellent video and a bunch of other great links about photographing jewelry and other products, so check 'em out...they really are worth a look and the more you can educate yourself on this topic, the better your products will look on your site!

Wednesday, June 9, 2010

A Couple Fun Blogs To Check Out

I have a couple funny blogs to share with you today.  (Just as a warning, you may end up sucking up a lot of your time looking through these!)

The first blog I'd like to highlight today was sent to me by my brother, after I posted my cheeseburger cupcake tutorial. Jim's Pancakes documents one graphic designer dad's mission to make cool pancakes for his daughter.  It's adorable and funny, and always fun for me to see other designer parents like myself using their talents just to get another smile on their kid's face!  What a lucky girl!!


Okay, so I've been going back and fourth in my head for a couple weeks now on whether to share this next blog, because it does have some bad language in it (including the title), and ID Mommy is a "family friendly" blog.  But, I have come to the conclusion that it's hilariousness is worth sharing, as long as you consider yourself warned about the language.  Check out "[Stuff] My Kids Ruined" if you'd like a good laugh, or some encouragement that you're not the only one out there whose kids have totally destroyed something in your home. Check it out behind a locked door when the kids are asleep, then quickly delete all records of this link so your kids don't stumble upon this incredible list of "ideas!"  Here are a couple recent photos posted, so you get the idea...


Wednesday, May 12, 2010

Craigslist Scam Alert: "Is it the same one in this online video?"

I love a deal, therefore, I love CraigsList. I know many of you are also big CraigsList shoppers, and probably sellers too, so I thought I'd share the latest scam to watch out for.

I recently posted an ad on CraigsList for a piece of antique exercise equipment I have...one of those old "belt massagers" that claims to jiggle away your body fat.  It's a pretty fun conversation piece, but we don't have our 1950's themed basement for it anymore and needed to find it a new home.

I received two emails today in response to my ad.  Once I received the second one with virtually the same wording, I knew it was a scam.  So, I Googled it to see if others have come across the same thing.  Here is what the email said:

"Thank you for getting back with me Gretchen

I'm very interested in this but before I buy it I need to know if its
the same one I'm looking for because I can't afford another mistake
Please check out this video here I uploaded

[insert their video link here]

If its the same one I will be there today to buy it

Many thanks"


This blogger posted a very similar warning about video links with the same basic email request to watch a video.  I can't seem to find what these links would end up leading you to, or how it would harm you, but it is safe to say that this is NOT an interested buyer!

I was stupid enough to click the link, which took me to a video site that wanted me to download some software to make the video play.  This is where it was going too far and I finally got suspicious enough to stop. Luckily I'm on a Mac, and since most viruses are designed for PC's, it did not work.  I'm embarrassed that I even clicked it in the first place, as I am extremely cautious of fishy emails, especially from CraigsList ads.  But, if I had a PC, I'm sure they would have somehow hacked my computer or something through this.  I really should have listened to my instincts in the first place, which were telling me that "I can't afford another mistake" doesn't make sense...I wouldn't obviously force them to buy it if they came out to see if it was "the same one" they are looking for.

So, enjoy finding awesome deals and selling your stuff on CraigsList...it's like virtual garage sale-ing!  However, watch out for anything suspicious and follow your instincts!  If it smells fishy...it's probably fishy!

Cool Music Website: Choose a Playlist Based On Your Mood

I've been a fan of Pandora for a long time...a website that plays music for you for free, and tailors what is played based on what you like.  (You tell it whether you liked or disliked the song they just played, and you gradually get your own customized "stations" to listen to)

So, when I heard about this other free music website I had to check it out.  It's called "Stereo Mood." This site plays music based on how you're feeling (ie. happy) , what you're doing (ie. spring cleaning) , or even what the weather is like outside (ie. it's raining or sunny).  You can select from a list of popular "moods" on the home page, or search for your own current mood.


I love using these kinds of websites as they always help me find some cool new song I've never heard or obscure artist, and then I can add it to my list of music to buy next time I'm on iTunes!

So next time you're stuck on the computer and are looking for something new to pump into your headphones, check it out!  You just might find a new favorite artist or song!

LinkWithin

Related Posts with Thumbnails