Showing posts with label photography. Show all posts

Friday, August 26, 2011

Friday Randomness...

I know, I know, my posts have been few and far between lately!  I'll spare you another email full of excuses and just get to the postin' already!  I have a bunch of randomness to share.

First, we had a family photo shoot at our home a while back, which was a birthday gift from my fabulous hubby, and was done by the most fabulous Erin Johnson.  (You check out her MOMtrepreneur interview on the right column of this blog.) It was such a perfect gift for me...a way to capture my sweet little boys' childhoods, and also to celebrate the fact that we survived (barely) a year of fighting to sell our home to get to this wonderful new (old) home on a lake! I think if you look closely you can see the relief in our faces.  There are SO many GREAT shots but I'll just post a few favorites...
All of us by the shoreline...love the sepia tone!

Sweet little Toby was losing his patience with this photo shoot stuff...started to tear up and retreated into his "Monkey." This one really captures his sensitive side!

My boys (and "Puppy") on the dock! Believe me, I'm about as close as I could be without being in the photo here! :-)
In my Paintertainment world, I've already shared about the county fair that has kept me busy...I've had several other face painting "gigs" this past week too, and am currently in the process of adding new products from 3 new vendors to my store! But I'm most excited that the first copy of my new face painting book just arrived in the mail yesterday and is now available for sale!  I've had so much fun making this book!!


The other thing I wanted to share unfortunately has no photos with it, but I promise it's not to boring.  ;-)  Over the past month or two my hubby and I have sortof evolved our evening routine and it's been awesome.  In the past we've gotten the kids in bed by 8, and then often spent the remaining 3 hours of our evening zoning out in front of the TV. Granted, I am usually doing other things at the same time, like emailing, crocheting, or whatever.  But sitting in front of the TV for 3 hours is just not the best use of our time.

So, without going into the lengthy story of how it evolved, here's what we're doing now:
8:00-9:00 - "The Productive Hour" - We both spend time getting something done on our to-do list. 
9:00-10:00 - "The Deck Hour" - We sit on the deck with a beverage, no computers, and TALK!
10:00-11:00 - "The Vedge Hour" - We vedge out in front of the TV.

It has been so simple yet so awesome in so many ways.  At the end of the night, instead of feeling like a vegetable, we feel satisfied that we've gotten something accomplished.  We have some quality time to connect and talk about our day without interruption.  And we still get to watch the Tivo'd shows we like.  Often times the deck hour will extend right up until bedtime and we skip TV all together. I suppose in the winter "The Deck Hour" will have to turn into "The Living Room" hour or something.

So there you have it.  A small change in our routine that is really a life changing thing, I think!  I know it may not work for everyone, but I thought I'd share it as a great way to cut a little TV out of your day, get stuff done, and stay connected to your spouse in the chaos that is child rearing!

Have a beautiful weekend everyone! 


Thursday, April 14, 2011

Some AWESOME German Advertising

These days there is so much advertising out there, it's literally impossible to get through an hour, let alone a day, without being bombarded by it.  This is why I get really excited when I see an advertising campaign that actually grabs my attention and makes me want to look at every detail...especially one that uses print.  These ads for a German job website do just that.  I guess this campaign is a few years old, so I'm pretty late in seeing it.  But, the fact that it's circling the web still is testament to it's success!


I can relate to these ads on so many levels.  As a designer, I am in awe of the creativity.  I consider this one of those "why didn't I think of that" kind of ideas.  As a human being, I can relate to crappy work environments.  And as a work-from-home MOM,  I often feel like these people trapped inside their boxes...working away tirelessly, seemingly invisible to the people they serve who just think everything just appears at their command out of thin air.  Sound familiar?!  ;-)  Enjoy!


Friday, December 31, 2010

Farewell 2010...time to archive the year's adventures!

The year is coming to an end...in less than two hours to be exact! 

This past week my husband asked me, "how can we keep our boys this age forever?"  I said, "through photos and movies!  It's the only way!" Sammy has begged me to "read" him his "baby Sammy book" (his baby photo album) about 6 times in the past couple days.  I love looking back through the years and I am happy that Sammy already does too!

Once Christmas and Sammy's birthdays are over, I kick my family memory archiving production into overdrive.  Now that the year is officially over (almost), it's time to wrap up my photo albums and family movies for the year.  For the past few years I've been doing our family albums digitally via iPhoto and having them printed by Apple.  I try to work on it throughout the year, creating new pages after each new family adventure.  I still prefer to create my own layouts in Photoshop and upload each page as one large image, rather than use iPhoto's layouts.  But, I really love how they are turning out and love to do them this way for several reasons...

1) They have a much slimmer profile than a scrapbook, and take up much less shelf space
2) Since I have everything backed up digitally, if anything happens to the books, I can always have a new one printed,
3) It's a big chunk of change at the end of the year, usually $70-$90 in the past depending on # of pages, but when compared to the price of all the supplies to do scrapbooking, or even to print pages digitally myself, it's actually cheaper.

I'm caught up through September now...a little bit behind but I hope to have it done and ordered soon!  I also do the same with movies...I keep running movie projects in iMovie and have been adding to them throughout the year.  One for each of my boys, and a third is all about our family activities together.  Working on them bit by bit throughout the year makes it much less daunting.  Can't wait to finish them, burn them, and watch them on our big screen!

I did just recently update my system on my Mac so that it could handle the new iLife '11, and have been pretty happy with the new iMovie so far.  I have been having some fun with the movie trailer capabilities it has, and put together one starting each of my boys, just as practice. But, I thought I'd share them because, well, I'm a mom and that's what moms do...they force everyone to look at cute pictures and movies of their kids.


Here's to a happy new year full of exciting blockbuster hits!!

Monday, October 11, 2010

ID Mommy MOMtrepreneur Tips: Photographing Your Products

Are you a fellow MOMtrepreneur who sells your products online?  If so, chances are you've had the need for good photos of what you make and sell. Having good quality photos of your products is really vital, especially if you are selling them online and photos are the only basis for your customers to make their decision on whether to buy.  Plus, professional looking photos will help your website and business look more professional.

Decide What to Capture:
Besides capturing an overall image of your product, you want to make sure your photos are extremely clear, and accurately convey your product's quality, color, texture, construction, size, etc.  Imagine you are shopping in a physical store location, and you see one of your products on the shelf.  How will you examine it and what will you want to look at? For example, if it's a bracelet, will you put it on to see how it hangs on your wrist?  Then take a photo of it on a wrist.  Will you look at the clasp to see how it attaches?  Take a close-up of the clasp.  The more details you can show, the better!

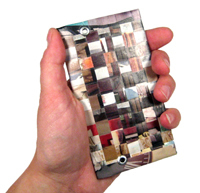
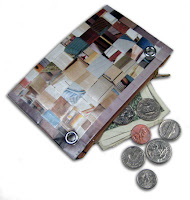
Here are a few examples of photos I've taken for my Junk Mail Gems site, highlighting different product aspects:
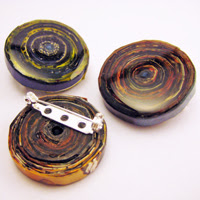


I do edit many of my product shots in Photoshop, often taking out the background completely so they are on white (like the coin purse and wallet above).  You may also want to experiment with other nice backgrounds and props, like sand, grass, wood, velvet, or whatever else might fit within the realm of the products you are photographing.  I always try to include something that helps show the scale of the product, when scale matters.  Things like the coins, hands, fruit, and hardware details help convey scale too. 

Camera
You'll obviously need a decent camera.  While you can spend hundreds or even thousands of dollars on equipment, I have found that for the purposes of shooting my product photography in my limited budget, my day-to-day digital point-and-shoot works just fine. I set the lighting to match the type of light I am using, put it on macro mode, and in my gorilla pod to keep it steady.  If I really want to keep it super steady, I will set it to take a photo automatically after a 10 second delay, so my hands are not even touching the camera when the photo snaps.


If you're using a digital point-and-shoot like me (I know, I know, you professional photographers are cringing now), get to know your light setting options.  This photo above shows the difference in the color of the plain white background (on the camera screen) when it's set at "cloudy" versus "incandescent" lighting on my camera.  You'll want to set it to match your light settings as best you can, so that the image on the screen most closely resembles reality.  I also set mine on the "macro" setting when I'm shooting something small and close-up, to get the best detail and make sure everything is in focus.

Proper Lighting
Lighting and the environment is really the most important thing when it comes to getting clear shots of your product.  Harsh lights will create harsh reflections and shadows, both of which hide your product rather than highlight it.  Photographing your products outside on an overcast day works great, because the clouds act as a diffuser for the light.  However, you can't always rely on the weather, and if you're like me and do most of your work at night when the kids are in bed, you can't rely on the sun still being up either.  The best way to prevent harsh lights and shadows indoors is to use a light box or light tent to diffuse the light and create a seamless background.

For years I used a simple cardboard box with "windows" of vellum or tissue paper taped to the sides, a piece of paper inside for a backdrop, and my desk lamps pointed at it.  This really did work great for so many of my small product shots.  All of the photos taken in the above examples were done in a cardboard box.  I was going to put together a tutorial for you to build your own, however, Darren Rowse has already posted a really great one online, here.  Mine looked almost identical to his:

If I had seen this earlier I would have tried fabric instead of tissue paper and had something a little more sturdy!  This site has another similar tutorial using a cardboard box.  You really don't need to buy any big, fancy equipment to greatly improve your photos!!

Once my little boy got bigger, I found myself re-making my mini photo studio because he would get his hands on it and rip it.  Recently I came across this great little set on Amazon for a great price.  For just $30 (at the time) with free shipping I got a compact, folding photo booth, a little tripod, and a set of lights...and this one I can fold up and tuck away from little boys.


 My only complaint with this product was that the back drop only had a gray and a blue side, and I like to use white for my photos.  So, I just taped a piece of paper inside instead:
The reason people like one curved piece of paper like this that spans the back and base, is that it gives you a seamless background, meaning you won't see a back corner running across all of your photos.

So, this is what my current setup looks like.  I point lights from the sides and top and find that my desk lamps work just as well, as long as I set my camera's lighting setting accordingly.  Depending on the product and what you're trying to capture, you may find that you need to adjust the angle of your lights, or pull them back if they are too bright, etc.  Play around with it and do some experimenting...it's the best way to learn!

Make Your Product "Smile!"
If you're married, you probably remember your photographer constantly adjusting things on you while taking your photo...spreading out your train on your dress, positioning your flowers, tilting your head, adjusting your veil...now smile!  The same goes for your product shots. Make sure there are no distracting smudges or fingerprints on your shiny jewelry.  Look at the background and make sure there is nothing distracting from the product.  (My wedding photographer was NOT good...we had background distractions in ALL of our pictures!)  If you have a label, make sure it's turned so that the viewer can read it.  Don't crop out something that an online shopper may want to see.  If you have a chain on a necklace, don't just let it fall in a pile...try arranging it artistically.    Little things like this can make a difference!

More Resources:
My sister recently passed on this great post to me from MomsWhoMakeStuff.com.  If you scroll to the bottom of the post, there is an excellent video and a bunch of other great links about photographing jewelry and other products, so check 'em out...they really are worth a look and the more you can educate yourself on this topic, the better your products will look on your site!

Thursday, September 16, 2010

Picky Sticky Picture Stickers

You may remember my previous post about how I take photos of my boys every week with a sign that says their current age...

With my first boy I taped the sign above his head on the chair he was sitting in.  With my second, I've been setting it on or next to him.  I have recently discovered the flaw in this plan, as he has started to grab his sign and eat it.
 A friend of mine just sent me a link to these great "Picky Sticky Picture Stickers," designed specifically for this purpose!  Simply peel and stick them to your baby's clothing and snap your photo.  What a great way to market this idea...just had to pass it on!  Maybe I should start printing my signs on some sticker paper instead!


Monday, August 16, 2010

MOMtrepreneur Interview: Erin Johnson of Erin Johnson Photography

I am happy to share another great MOMtrepreneur interview with you!  Today's super mom business owner is Erin Johnson of Erin Johnson Photography.  Erin and I go to church together and I have seen a lot of her amazing photos!  Erin and her husband  live in Chanhassen, MN with their two daughters, 6 year old Sara Jo and 4 year old Nora.  I know she is one very busy woman with an overflowing plate and am so honored that she found the time to share her insights with us today!

What did you do before becoming a Work-at-home mom? 
I started my business a few months before Sara Jo {now 7 years old} was born when I was 23 years old.  Before that I was working at a children's photography studio.

What was the final “push” that got you to take the dive into leaving the 9 to 5 behind and run your own business full time?
I worked for a difficult boss so it was time to move on.  Once I left that job I waitress a little and my business just started happening.  I started taking photographs of friends of friends and then people just kept sharing my name with other people.  I then had to work a little backwards to create a good business.

What skills or education from your background do you think help you the most in your success as an entrepreneur?  
I have always been an artist.  I have a natural talent with photography and in visual arts.  I came from a line of entrepreneurs.  My father had his own business and everyone in his family does also.  Being a mom helps me run a business because I have to be the queen or multi tasking!  Being an artist and a business women came naturally for me. 

What new things have you learned since becoming a business owner?
What haven't I learned!  I have learned so many life skills like how to treat people, how to be humble and how to forgive others and more so how to forgive myself.  Running a business like mine where I am documenting people's most valued moments and/or intimate days teaches me how to relate to people and their situations.  I have learned endless office skills and computer skills. 

What’s the most challenging part about being a Mom + business owner for you?
Everything!  It is so hard to balance my life.  I have learned to set hours for my business even when working at home.  Childcare has been one of the best things for both me and my kids.  I figured out that I couldn't be good at either if I was trying to both at the same time.   

How would you define “success” for yourself and/or your business?
Money is a good thing but more than that I bless people.  My business is my ministry.  Not everyone can give the gift of good photography.  I have taken photos of many hurting people and my photos have helped them heal and find peace.  My photos have also reminded people of some of the happiest moments in their lives...how amazing that I can help people relive that.  Success to me is giving back and blessing others.

What advice would you give a new mom looking to start a business from home?
Put your family first!  Revolve your business around what you want out of life and don't let your business be your life.  Find balance between the things that matter and your business.

Is there anything else you’d like to share with us that I may have missed?  
Owning your own business is an amazing adventure but along with all the ups there are many downs.  I think it takes the right kind of person to have what it takes to have a successful business working for yourself.  I think your business should be something you are passionate about and love doing.

THANK YOU so much, Erin, for sharing your experience and insights with us!! Please check out Erin's website, as well as her blog, to see more of her amazing work! Every time I go to her website, I find myself getting sucked into her photo gallery and spending way more time there than originally intended! ;-)

LinkWithin

Related Posts with Thumbnails